A thunderstorm creates a power outage at your haunt. A water main breaks inside your venue. Your entire staff comes down with the flu.
There are many reasons why you might need to close your haunt for the night. But before you panic at the thought of losing out on all the ticket revenue you’ve earned, read our tips for managing a temporary closure, including how to communicate with guests and what you can do to keep them happy without making hundreds (or thousands) of refunds.
Let Your Guests Know
The most important thing to do once you’ve decided to temporarily close is to communicate with guests. Inform them of their options, which may include exchanging their tickets for a rescheduled date, allowing them to attend a future event of their choice, or a refund. Continue reading below for our best practices on refund policies.
Give your guests as much notice as you can, understanding that last-minute postponements sometimes can’t be helped.
The simplest way to notify your guests of a postponed event is by sending an email notice through your HauntPay account. Here’s how:
From your Manage Events page, click the Select an Option dropdown menu for your postponed event. This will allow you to compose the email and send to all upcoming event times, or select specific event times to notify (i.e. an update specific to just one date).
Note: You can currently only bulk email event attendees to events that have not yet ended.
Website
Be sure to update your website and/or ticketing page with information about the postponement.
Social Media
You may also want to update your social media pages and include a link to your website where guests can find more information about their options, or remind them to check their email for details.
Let Guests Reschedule Their Tickets
Rather than immediately jumping to refund all your guests’ tickets, consider whether exchanging their tickets would actually make everyone happier.
Ticket purchasers can now reschedule their own tickets as long as 1) the event organizer allows it, and 2) your event time has not passed. If both of those apply, here is the information on how to reschedule your tickets.

Log into your account and navigate to your My Tickets page (see above, or click here). From your My Tickets page click on the “Reschedule” option (see below).
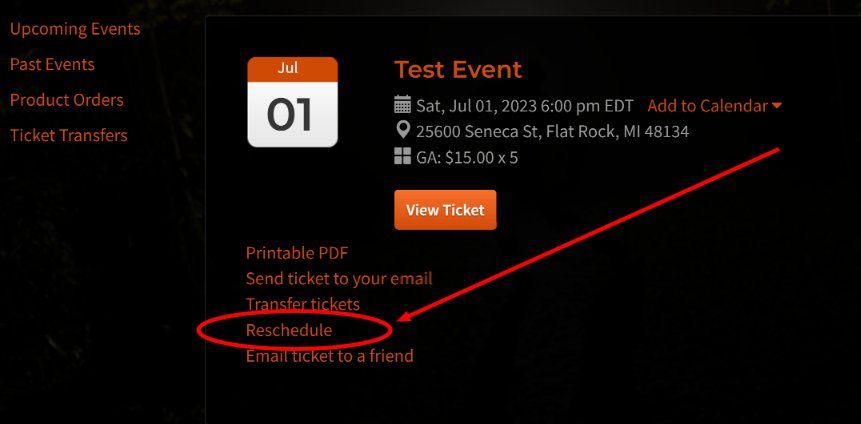
This will pop open a form to select a new event time and the quantity to change. Click into the New Timeslot dropdown and select your new event time, and select the number of tickets to change from the “Quantity” dropdown (or leave “All” to change your entire order). Once you have both selections click on “Reschedule” to update your tickets.

Or Edit Them Yourself!
If your ticket date has already passed, you’ll need to edit customer orders yourself (…or enlist our support team; we’d be happy to help get it done!). Your HauntPay account makes it simple to edit a customer’s order so that their tickets can be used when your event is rescheduled.
You can modify one (or any combination) of these things:
- Switch the event
- Change the ticket type
- Adjust the date and time
Accessing the Edit Order Page
To edit a customer’s order, you can access the edit order page from either your transactions report or your upcoming events page.

From the Transactions Report
- Navigate to your transactions report.
- Click on the individual transaction ID number in the first column.
- You will be taken to the customer’s transaction details page.
- Click on the edit icon next to the individual ticket you wish to change, or click on the edit icon next to “Associated Tickets” to change the entire order at once.
- Make your desired changes and click the checkmark to finalize them.
Emailing Updates to the Customer
Finally, if you’d like to send your customer their updated tickets, simply click “Email Receipt/Tickets to Customer” at the top of the transaction details page you’re already on.
And that’s it! You have successfully edited a customer’s order and sent them their new order details. If you have any further questions or need assistance, please don’t hesitate to reach out to our support team.
Take Advantage of Our Concierge Support
You don’t have to do it alone! We know there are many logistical concerns you need to deal with when postponing an event. Let our team handle the ticket changes so you can focus on staffing, working with the venue, and entertainment.
Do You Need to Refund?
There may be some cases when you decide you need to issue a refund to some (or all) guests. But it doesn’t have to be your first and only option.
Establish a Refund Policy and Make It Very Clear to Guests Up Front
We strongly suggest you stick with the default “All Sales Final; No Refunds or Returns” policy, though you’re welcome to edit that policy as you like in your venue settings. With that said, we realize that sometimes extenuating circumstances come up and you’ll need to give a refund or two. This depends on your individual business and the nature of the situation.
Bend the Rules as Needed, on a Case by Case Basis
Occasionally, you may encounter guests who cannot attend on the rescheduled date. The options to refund a customer’s purchase are available in their transaction details. You can use the Transactions Report filters to quickly locate their transaction by the last 4 digits on the card used to purchase, name on card, or date and amount of their purchase. Then click their ID number (first column) to go into their transaction details. Another option is to look up the customer by name or email address in the Upcoming Events guest list, click their transaction ID number, then “View Transaction” to go into their details.
Once in their transaction details there are 4 options next to the transaction number: Print Receipt | Print Ticket | Send Customer Receipt | Refund Transaction. Clicking “Refund Transaction” will present three options for a refund:
- Full Refund – Issue a 100% refund for the entire order, and void all tickets and products included.
- Partial Refund – Manually enter an amount to refund. The status of tickets and products will not be updated.
- Ticket Refund – Select individual tickets or products from the order to refund (multiple items can be selected). Tickets or products that are refunded this way will also be voided.
When a refund is complete, we don’t send anything to the customer by default. You’ll want to let the customer know that the refund is complete and the funds will hit their account within a few business days. You can also click “Send Customer Receipt” on the same transaction details page to send a new receipt to the customer showing the refund line-item.
Need Some Help?
We know that things can get hectic when you’re faced with a temporary haunt closure. So please don’t hesitate to reach out to our team if there’s anything we can do to assist. We’re here for you!
Email our support team at help@hauntpay.com, call us at 877.339.FEAR (877-339-3327), or send us a message from your HauntPay dashboard.